Marketcube App Installation in Your Online Store
This guide will walk you through the steps to install the Marketcube app on your Shopify store as a Marketplace Owner.
By the end, you'll understand the complete setup process - from account registration, email verification to onboarding and app installation.
(A.) Registering yourself and setting up a Free Trial
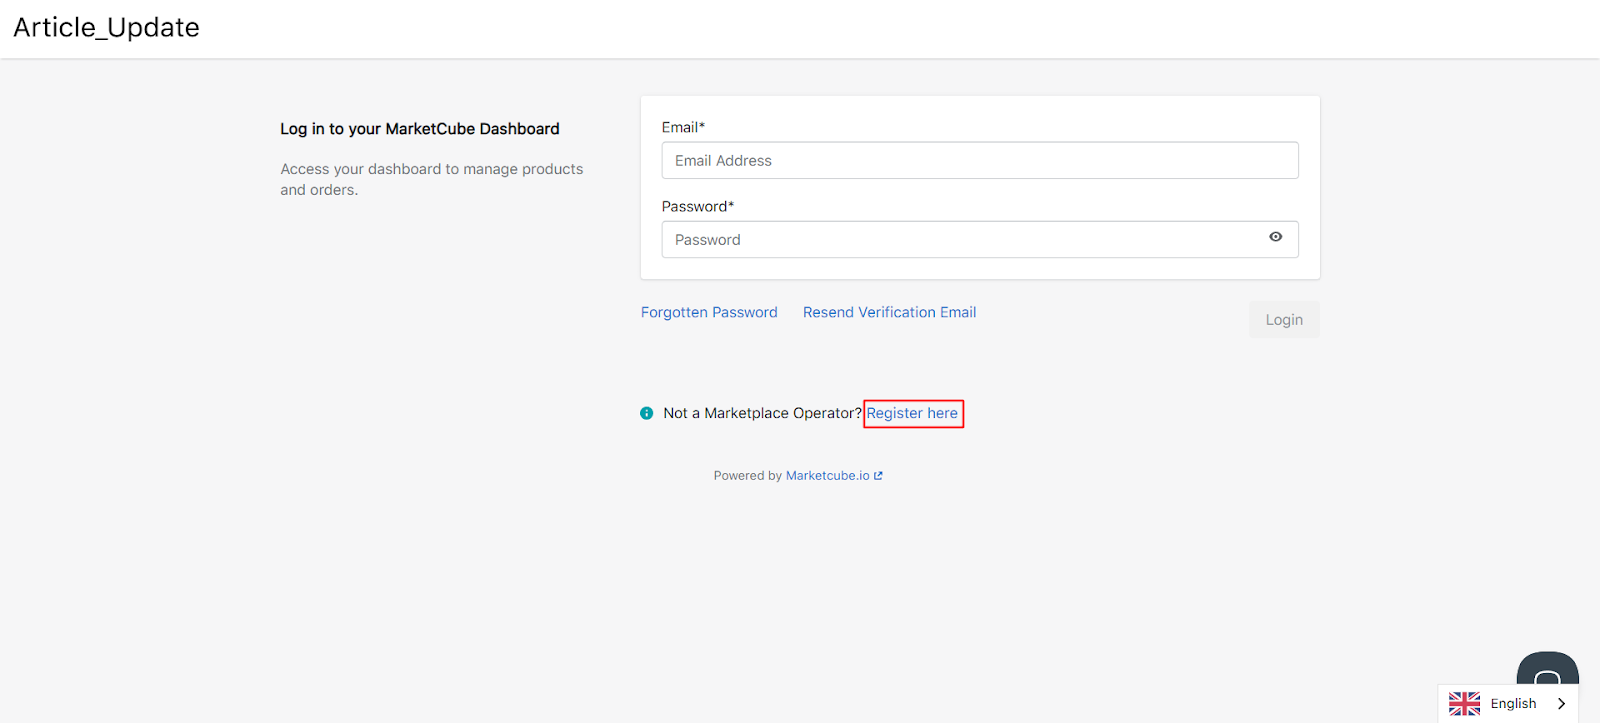
👉 Step 1 => Visit Marketcube login page designed for Marketplace Operators by clicking HERE, then Click on “Register here” as shown below.
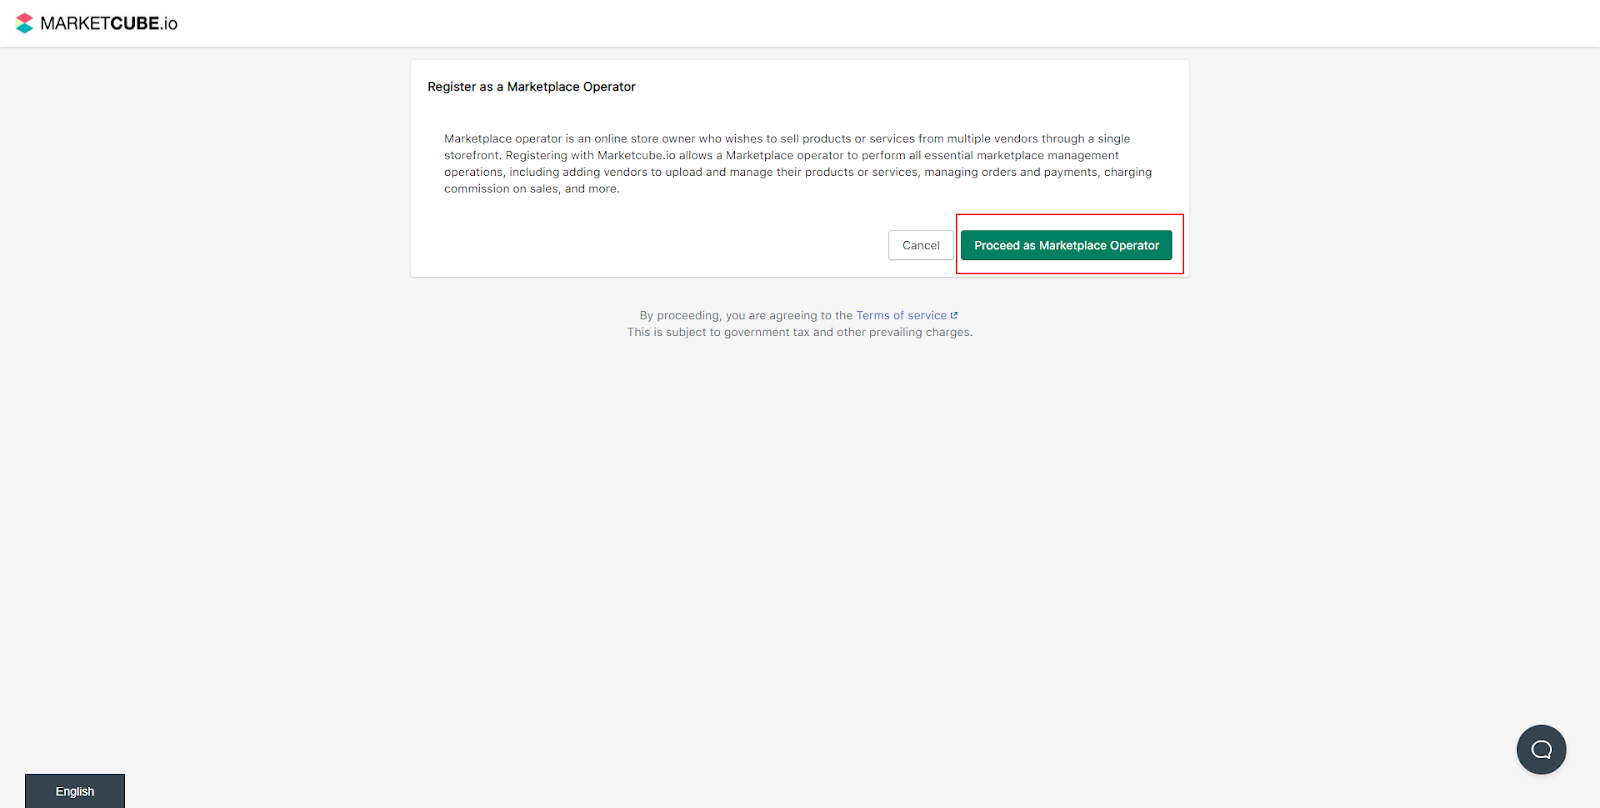
👉 Step 2 => Select Proceed as Marketplace Operator (as shown in the screenshot below)
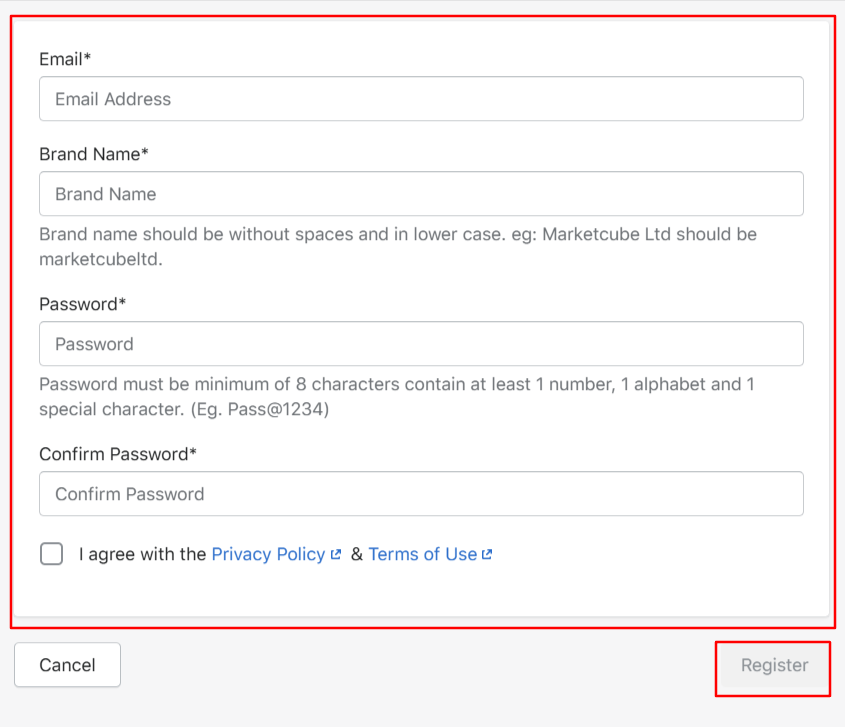
👉 Step 3 => Fill in all the required details and click “Register” to submit your brand information and register yourself as an operator on Marketcube (as shown in the screenshot below).
👉 Important Note
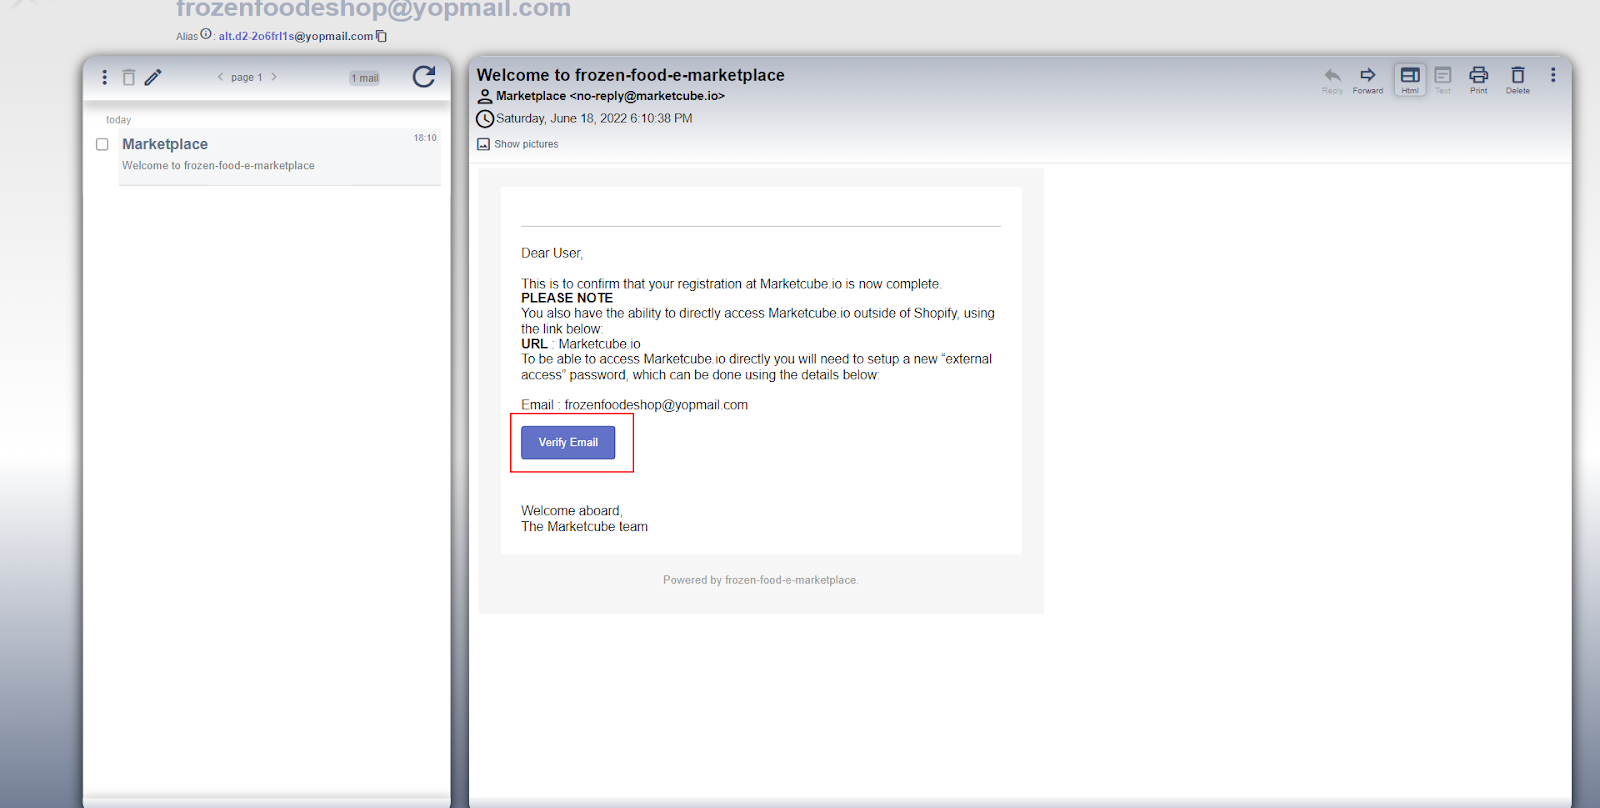
Once you’ve successfully registered, you will receive a verification email on your registered email ID. Please open the email and verify your email address by clicking the link provided (as shown in the screenshot below).
👉 Step 4 => Once the email is verified, Now login into your Marketcube account using the link
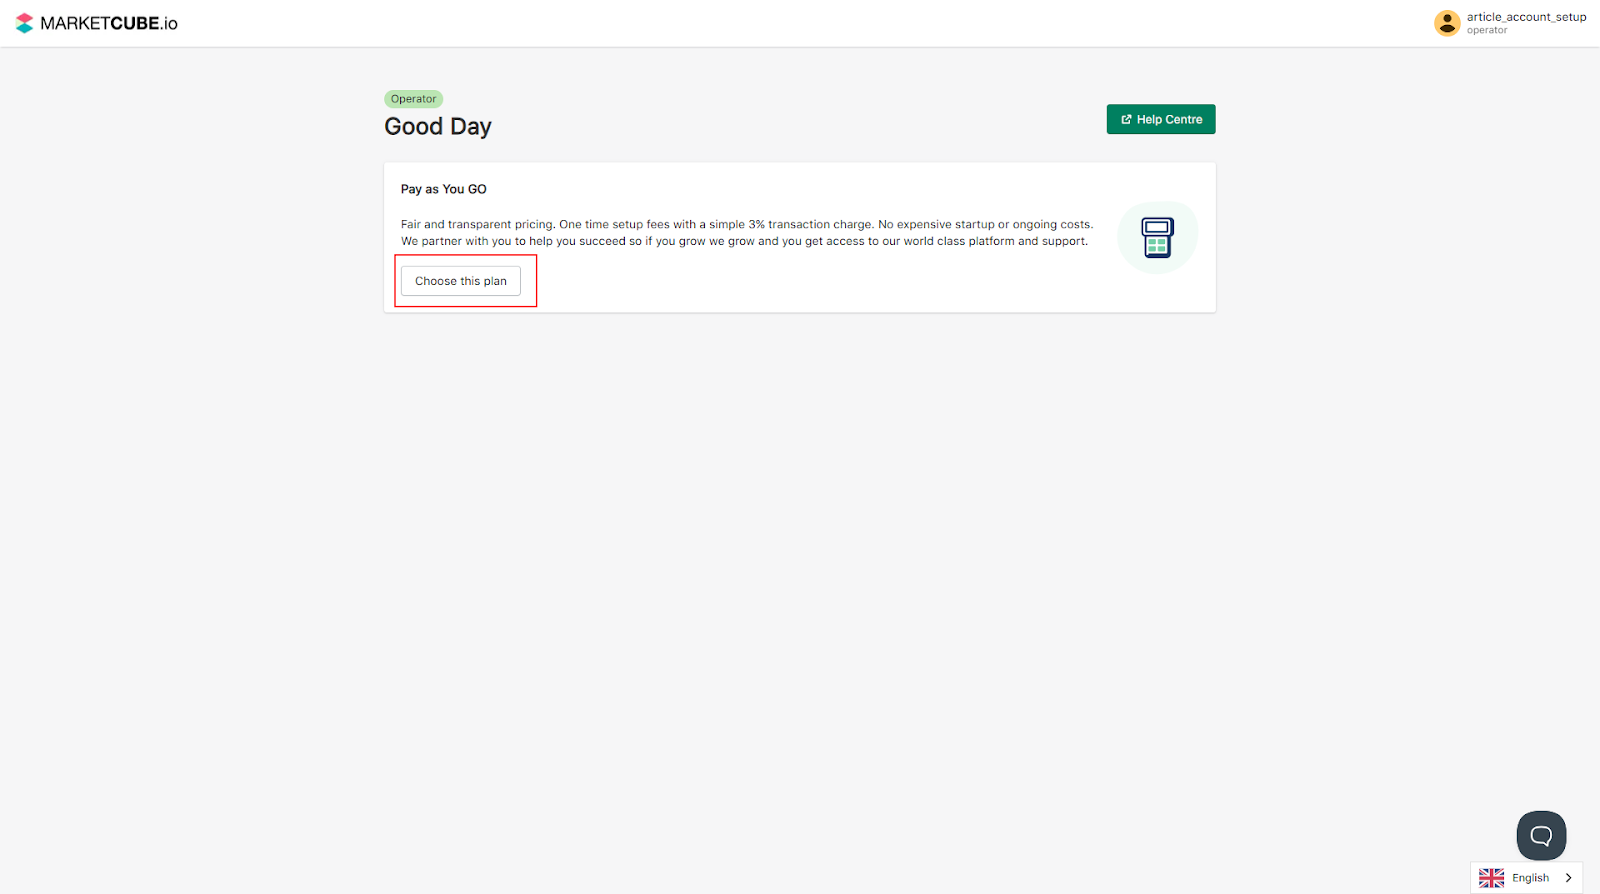
- After logging in, you'll be directed to the payment page where you can click "Choose this plan".
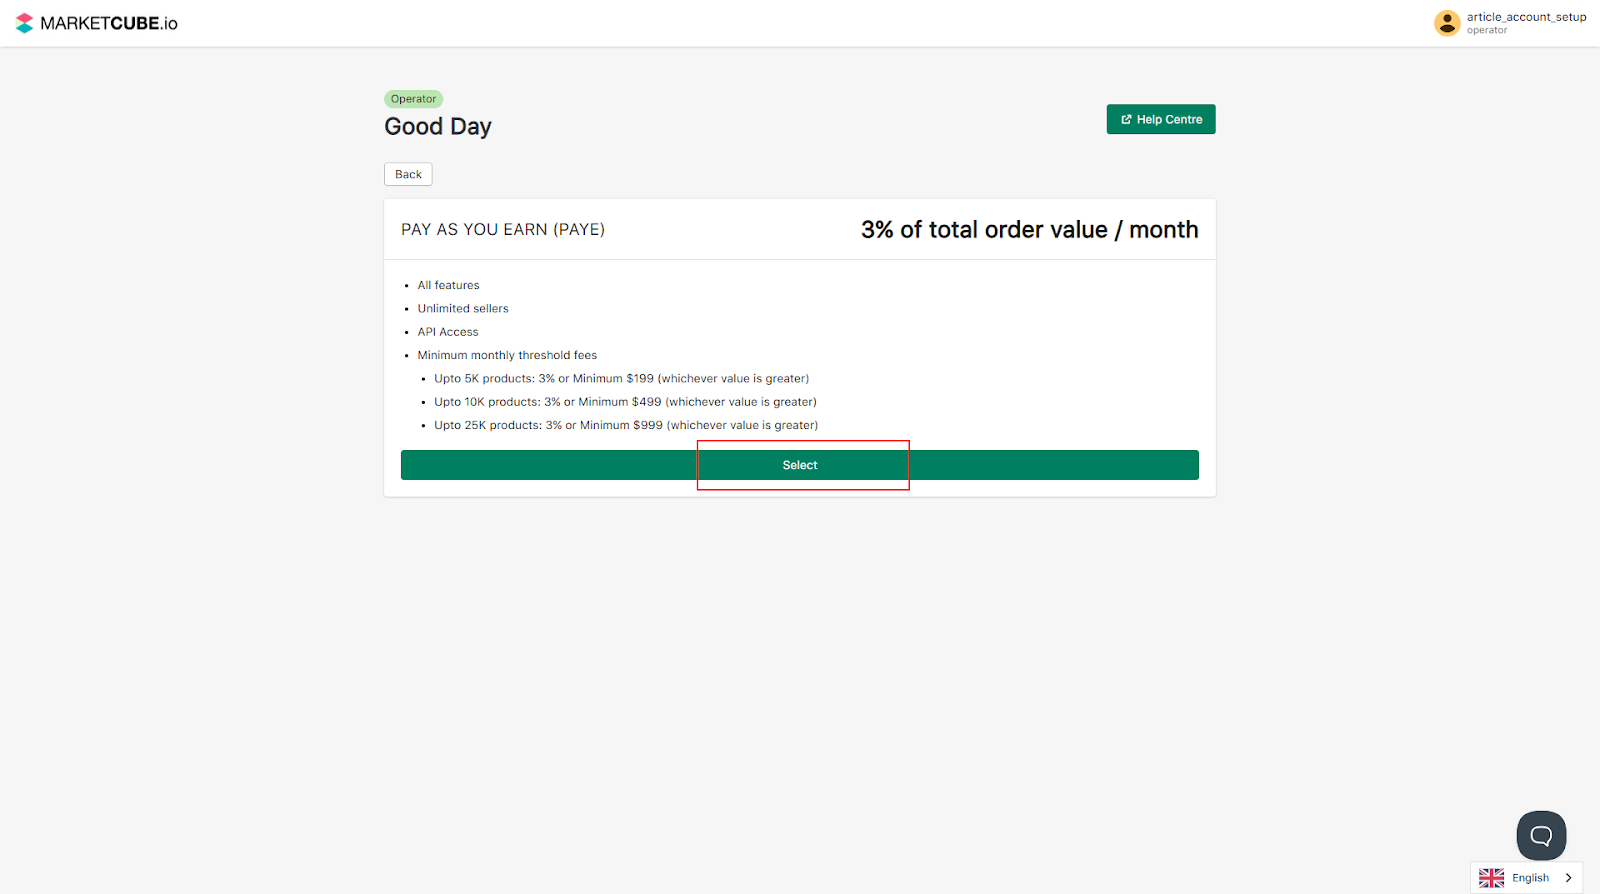
- Once you select “ Choose this plan” you will be redirected to the “Pay As You Earn (PAYE)” plan page, where you’ll need to click on “Select” to proceed.
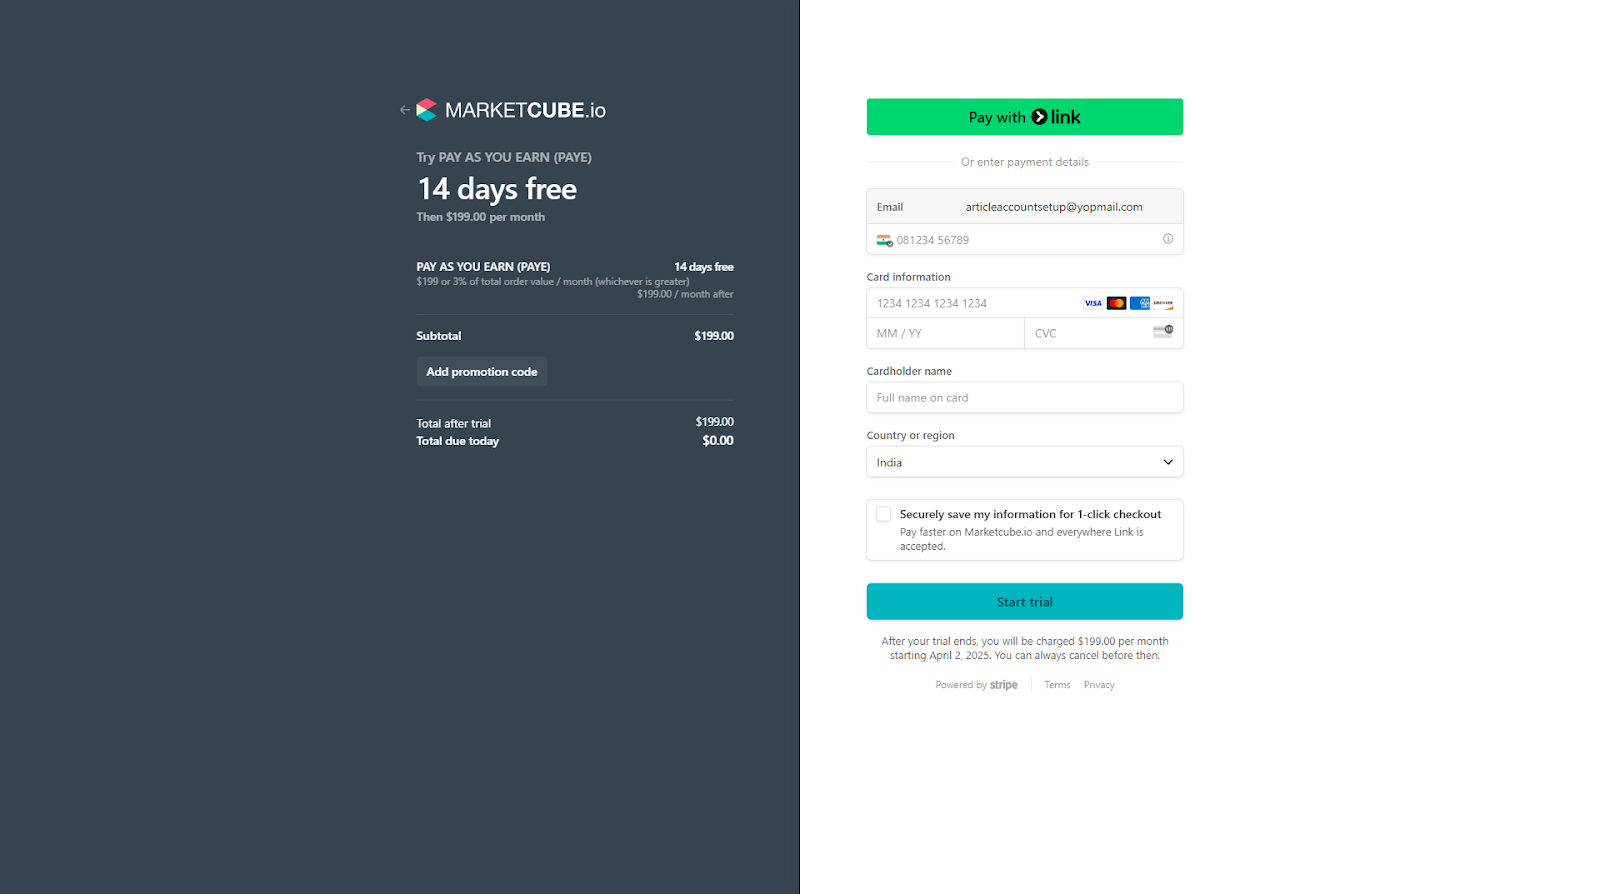
- Once done you'll be redirected to the Payment page. Enter your card details in the designated fields and click on “Start Trial” to proceed.
You’ve successfully registered, and your 14-day free trial has begun!
Let’s now move forward with our next phase which is onboarding yourself in the Marketcube app where you just registered & installing it to your online store.
(Note: In this guide, we use Shopify as an example to represent an online store platform.)
(B) Onboarding & Marketcube App Installation
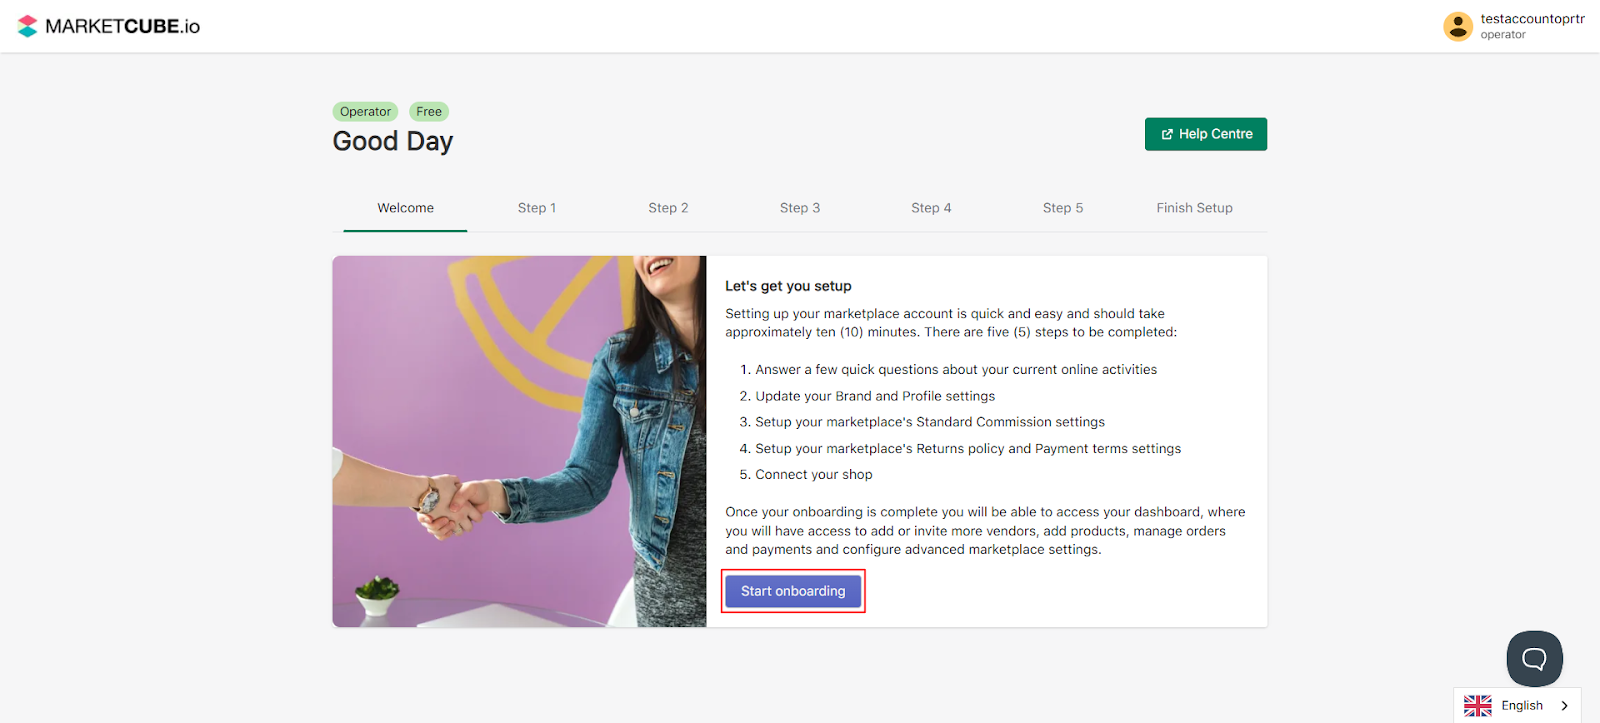
👉 After registering and starting your trial you will be taken to a welcome page where you can click "start onboarding" to proceed with your app onboarding.
- As part of the onboarding process, please complete all the steps by filling in the required details and clicking “Next Step” as shown in each screenshot.
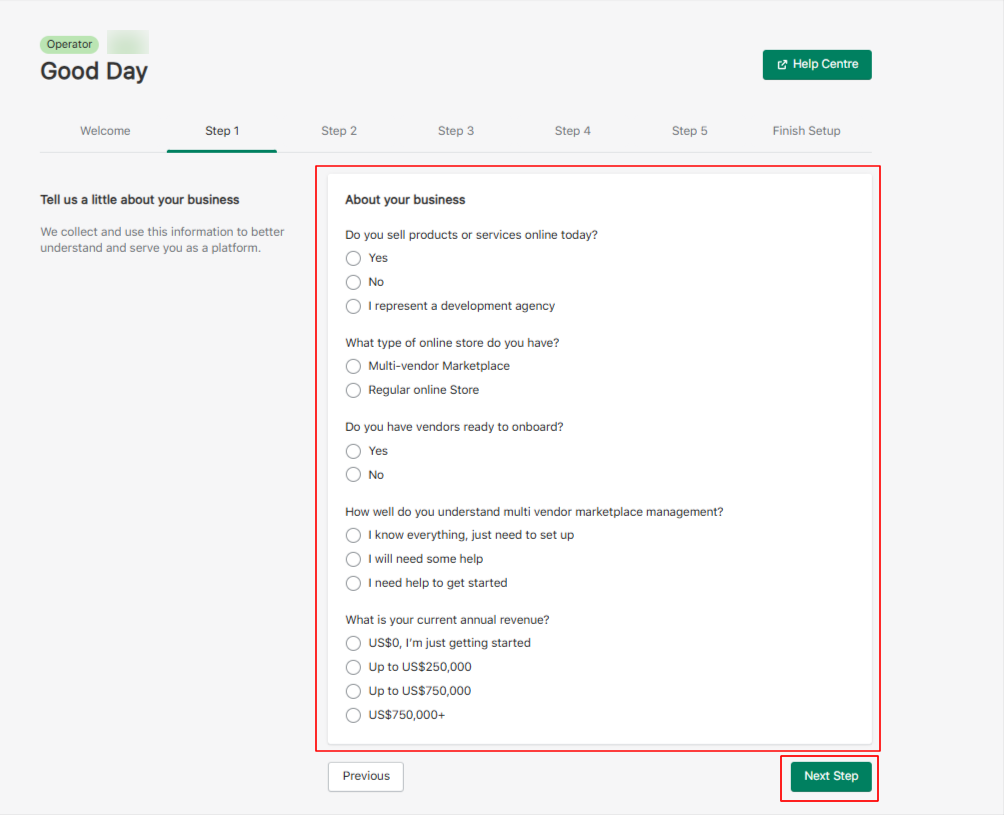
👉 Step 1 will require your Basic details
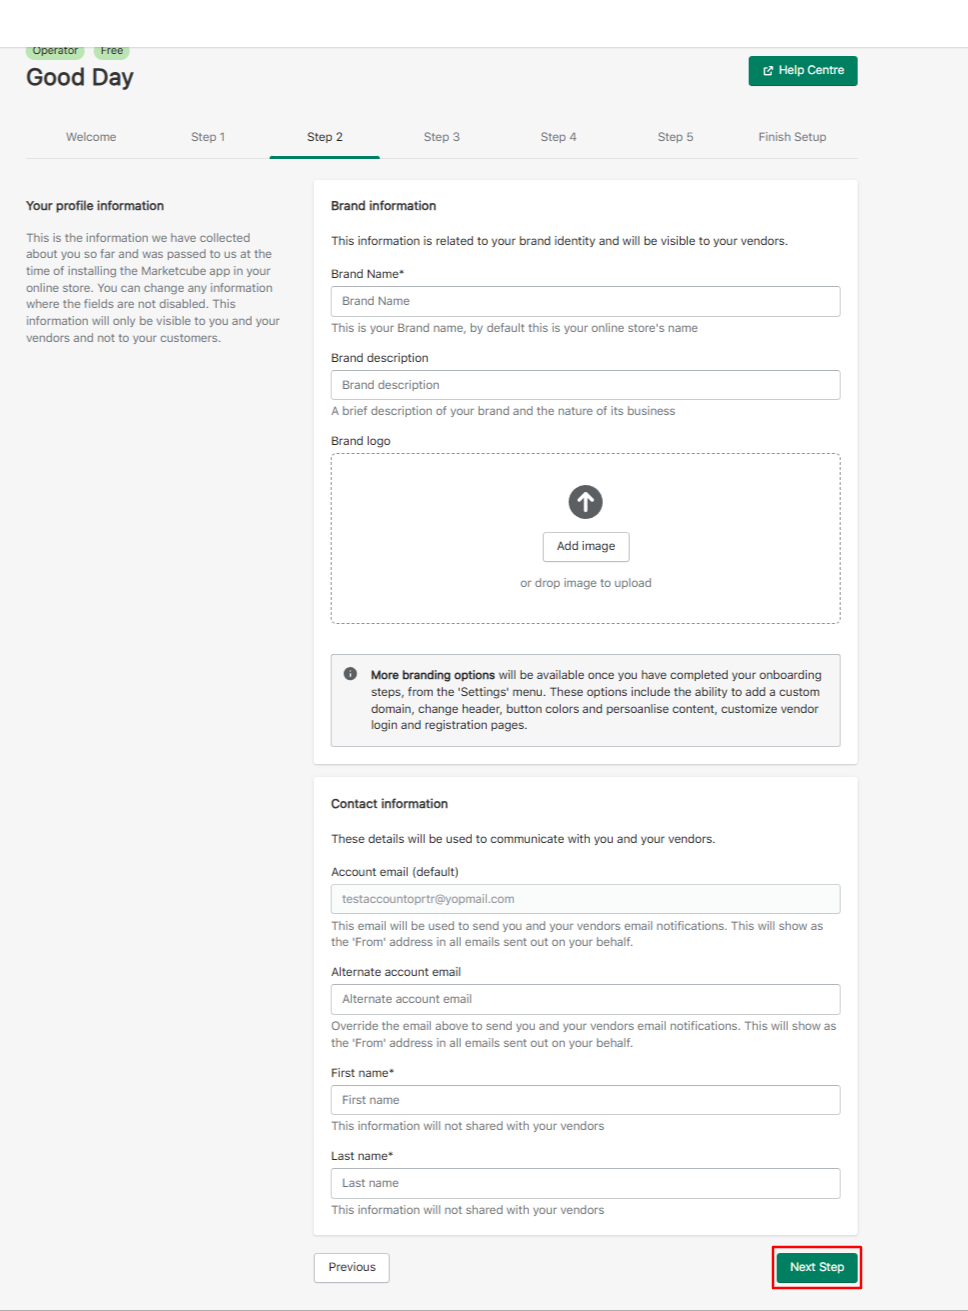
👉 Step 2 will require your Brand and Contact information
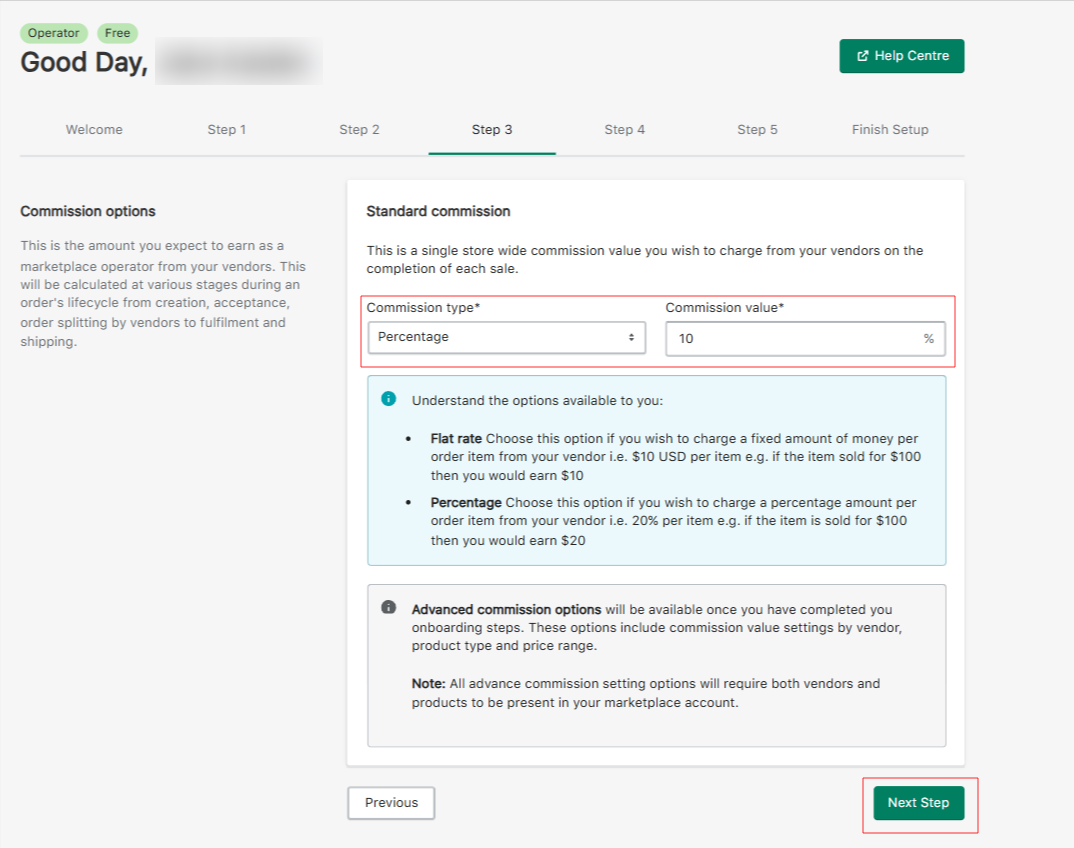
👉 Step 3 will will require the Commission Options
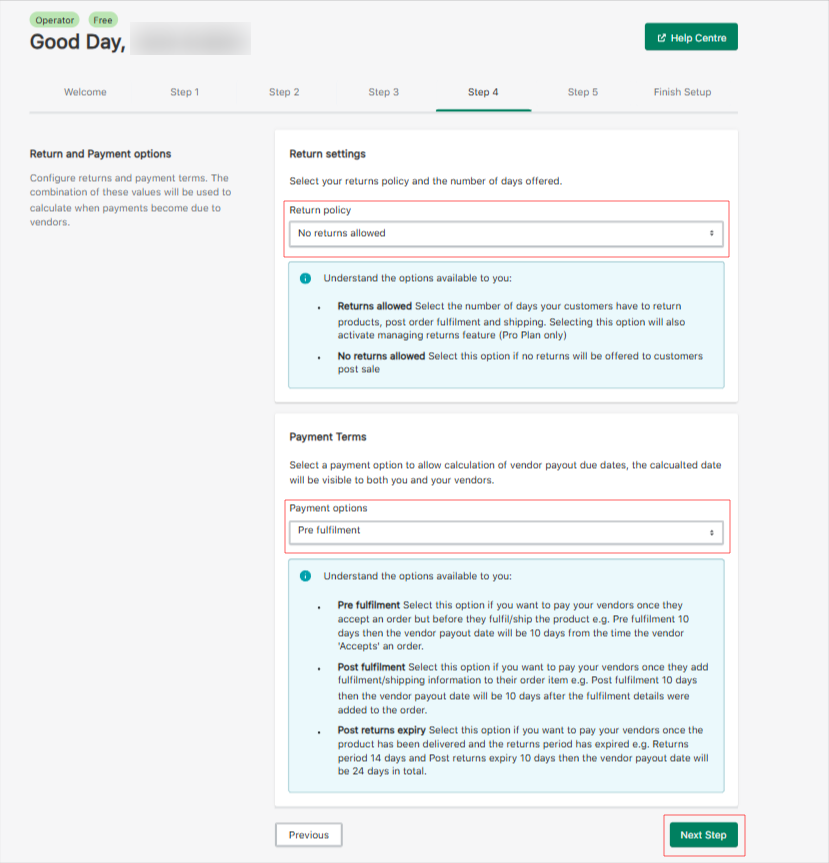
👉 Step 4 will require the Return Settings and Payment Terms,
👉 Step 5 will display the instructions required to successfully install the Marketcube app on your online store (in this case, Shopify).
The screenshot below provides an example of this screen. Please follow the instructions carefully.
- Note: To help you through this step, you can refer to a video 👉 Here👈 which demonstrates the process both on Marketcube (Step 5) and how it's carried out on Shopify.
Let's now follow these instructions one by one starting from your Marketcube account and moving to Shopify, to begin the setup process.
(A) Configure Shopify App

- From your Shopify Admin Panel, navigate to the left-hand menu and click Settings

- In the Settings window, select Apps, this will open a new drawer window, go to Develop apps on top right and select it.

- On the next screen, select Build apps in Dev Dashboard.

- You’ll be taken to another screen – Developer Dashboard. From here, click Create app to continue

- Enter a name for your app, in the app name field (for example, “Marketplace Integration”, & then click Create.

- Once you click on Create, it will take you to another window where under the App URL section, you need to copy and paste the URL shared in your Marketcube setup guide. (as per the screenshot below)


-
Scroll down on the page and, under Scopes and Redirect URL as well, copy and paste the values provided in your Marketcube setup guide and click on Release button.

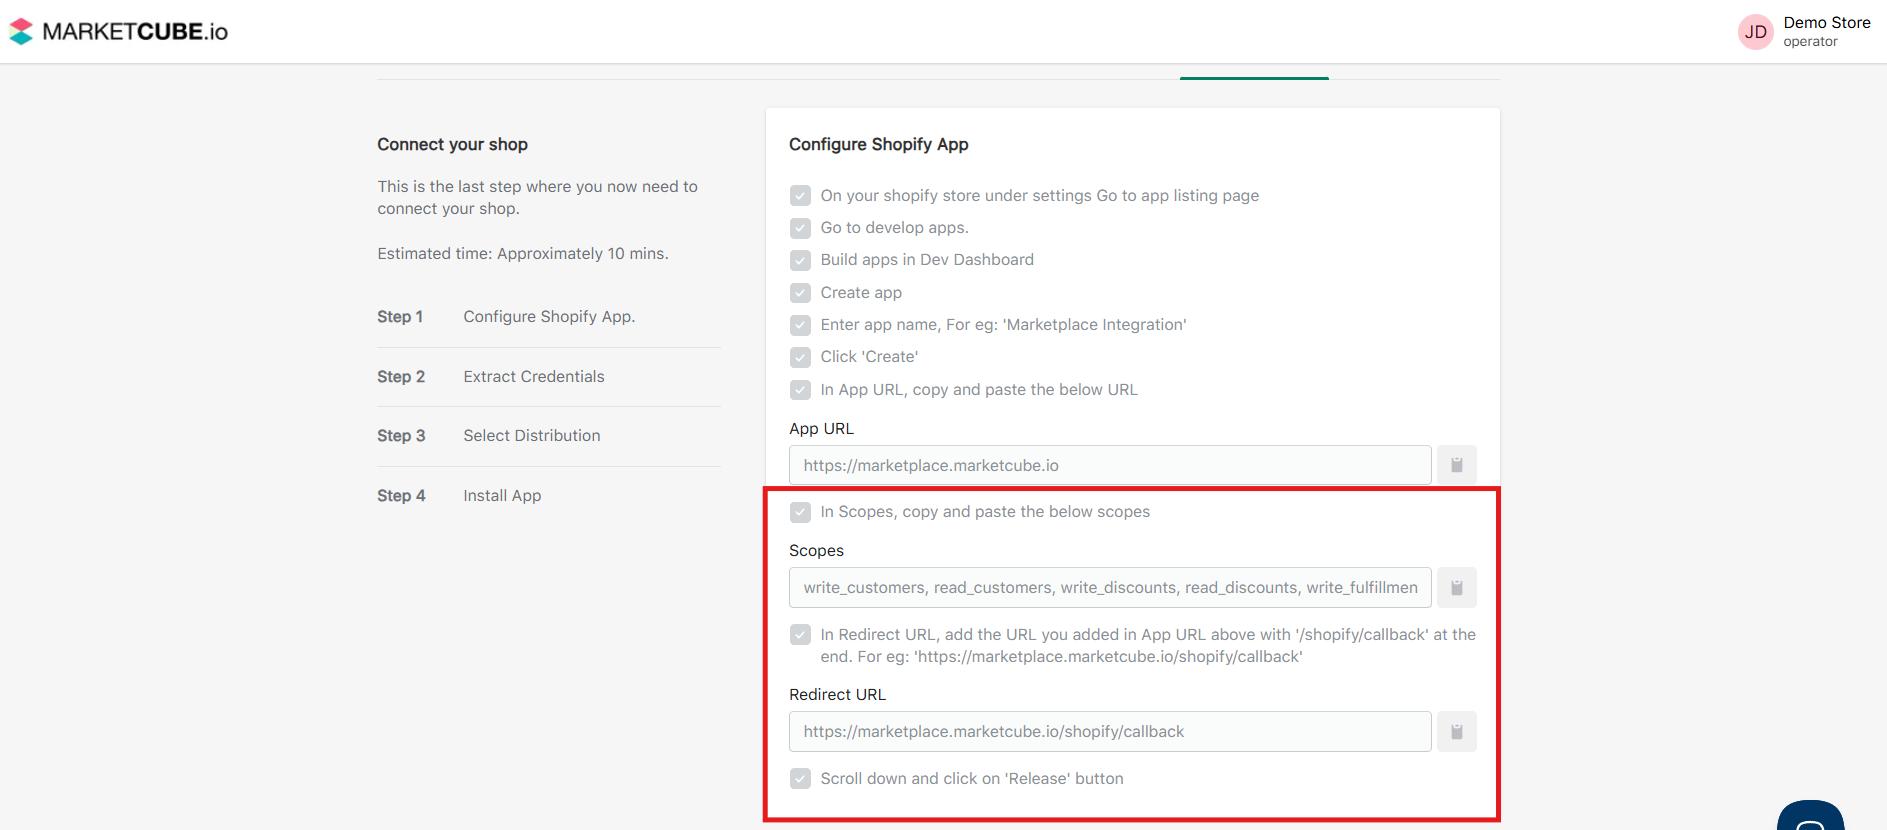
- Further a confirmation dialog will appear. Click Release again to confirm and proceed.


(B) Extract Credentials

- From the Shopify Developer Dashboard, click Settings in the left sidebar & under the Credentials section, copy the Client ID and Secret Key and further paste these values into the corresponding Client ID and Secret Key fields in your Marketcube setup screen (as shown below)


(C) Select Distribution

- Next, from the Shopify Developer Dashboard, click Home in the left sidebar & in the Distribution section, click Select distribution method to proceed further.
- Note: If you do not see the Distribution option, you can install the app directly by clicking Install app on the app’s home page.

- A new window will open in your Shopify Partner account. Select Custom distribution & then click Select to continue.

- Further a confirmation dialog will appear. Click Select custom distribution again to confirm and proceed.

- After selecting Custom distribution, you’ll be taken to another distribution screen. Enter your Shopify store domain (for example, yourstore.myshopify.com) in the Store domain field & copy the same store domain and paste it into the Shop field shown in the Marketcube setup.


- Once both fields are filled, go back to your shopify distribution window and click Generate link .
- Further a confirmation dialog will appear. Click Generate Link again to confirm and proceed.

- Copy the generated link shown on the Distribution screen & paste this link into a new browser tab and press Enter. You’ll be redirected to Shopify to authenticate your store.

- Select your store to continue the process.
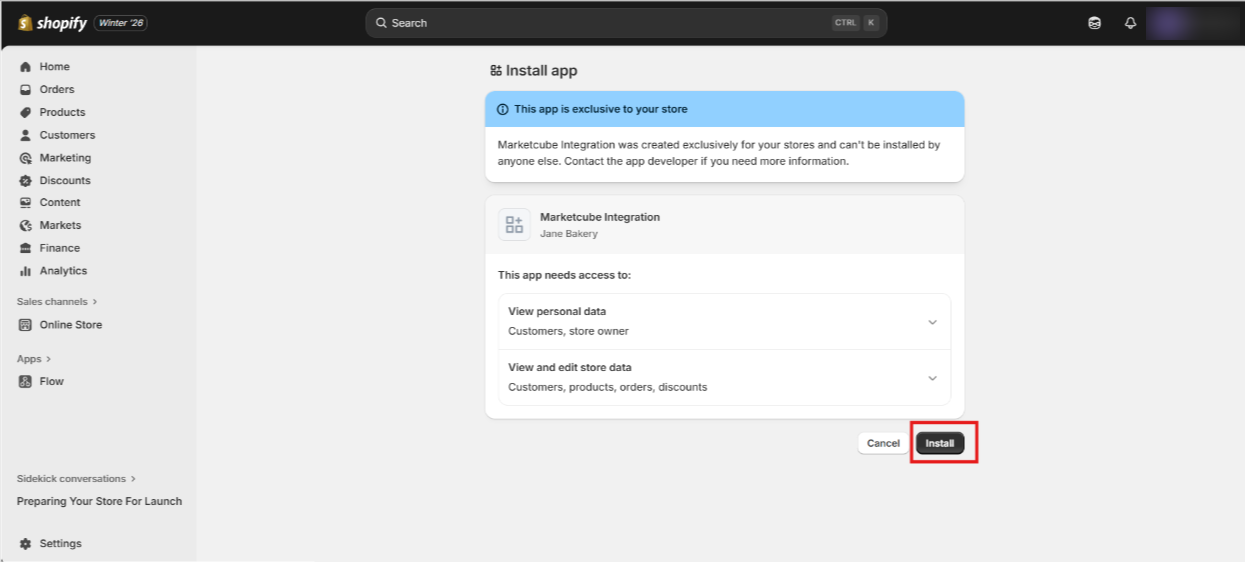
(D) Install App

-
Once you select your store for authentication , it will lend you to an Install app window (as shown below) where you need to select the Install option.

- Once done , go back to your Marketcube window and tick the install app checkbox and select Next Step.

Important Note
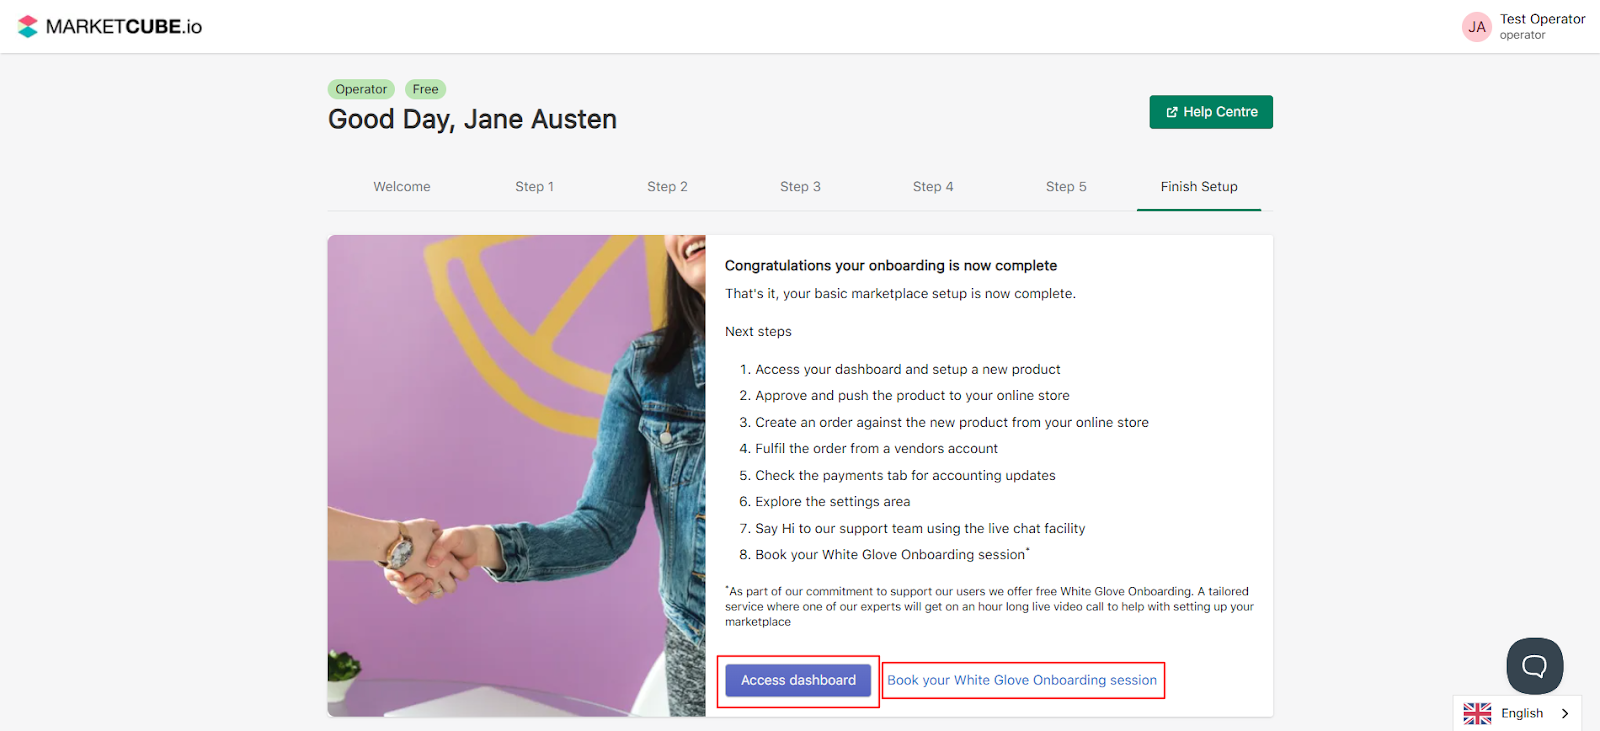
After completing all the instructions on the final screen and installing the app, you’ll need to finish the process by clicking the “Access Dashboard” button.
If needed, you can also book your White Glove Onboarding session using the link provided on the same screen (If Required) for further assistance from our team.
Got more questions? Use the chatbox on the right to get in touch with us or email us at support@marketcube.io.